Create a Business Model

NEW DEMO: In addition to a Business Model, you can first create a Business Model Canvas via import excel data to model your business.

This tutorial will introduce how to create a business model via de AR and VD.

The Dragon1 modeling language enables the creation of business models at a conceptual, logical, and physical level, high level and in detail. This makes sure you can model the problems in the current state and solve the problems with solutions in the future state.

Dragon1 has a unique approach to creating business models. You start with three circles depicting three different worlds: The consumer/customers world, the channel partners world, and the supplier/producers world.

Next, you deepened every world. What does it look like, and what are the drivers for the stakeholders and actors in these different worlds? What applications and technology are you using? How do you, with your goods, products, services, and business, bring them all together?

Business Model Example

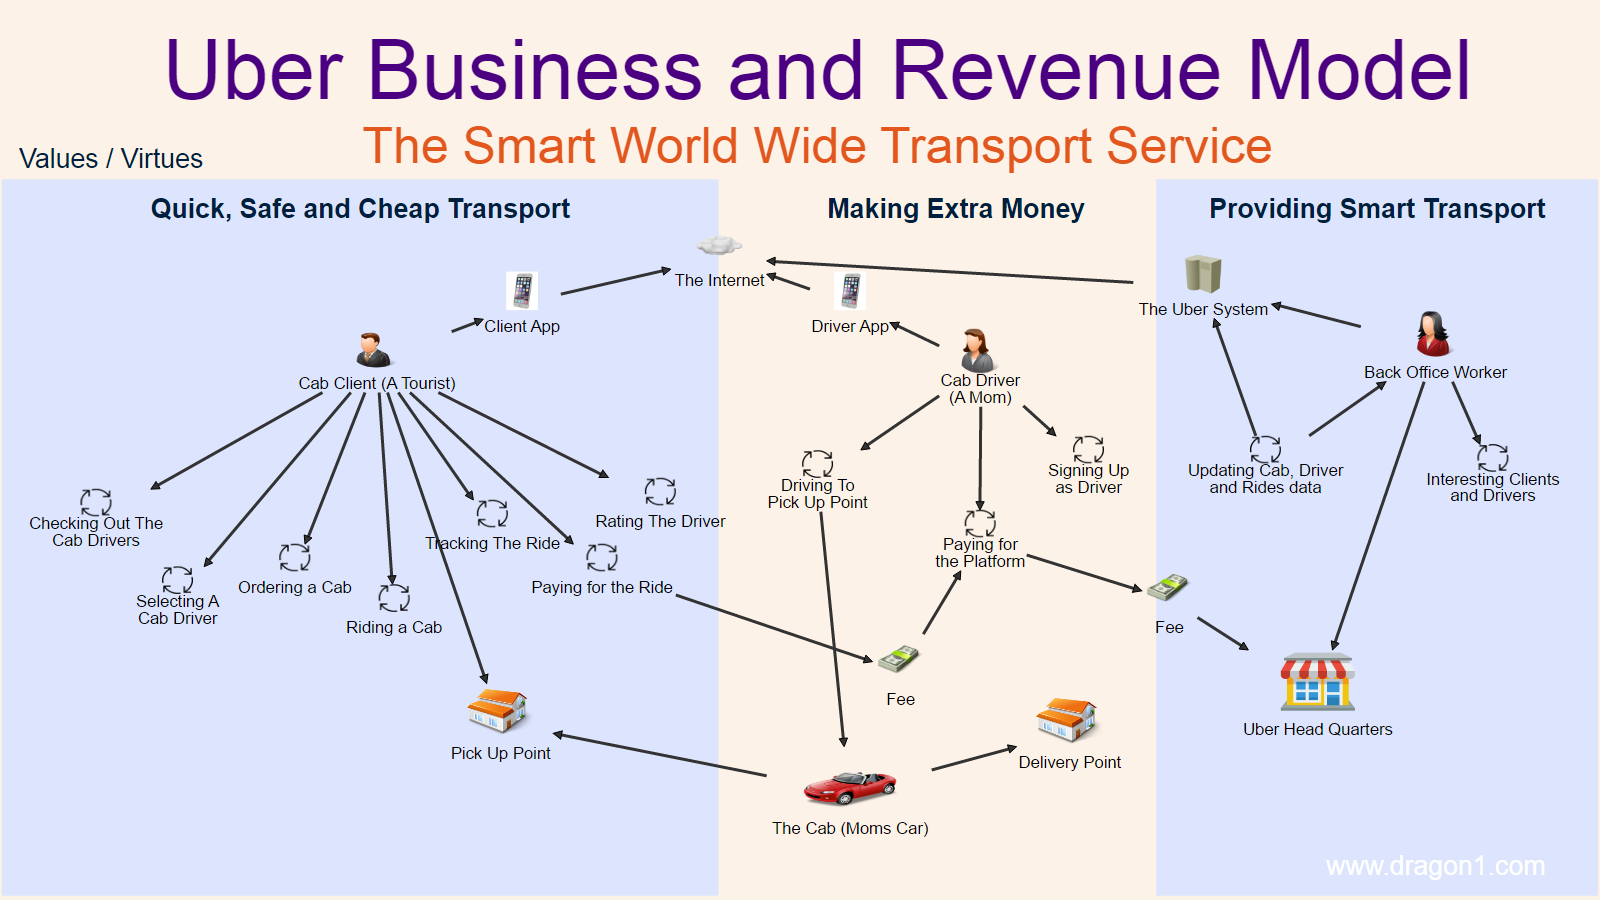
This visualization shows an example of a business model.

business model uber

Example of the Uber Business Model.

An overview like this makes it easier to communicate your business model with stakeholders. And also to measure and improve your business model.

Common Entity classes to use in Business Model are:

  • Value Proposition
  • Clients
  • Market-Segment
  • Key Channels
  • Key Partners
  • Value Stream
  • Earnings stream

Steps in the Tutorial

To create a business model, you will take the following steps:

  • Create a dossier structure
  • Enter data
  • Create a business model and a few detailed models, using the data
  • Create links between the models
  • Create views, using the models
  • Create links between views
  • Create a visualization, using the views
  • Publish the visualization to the Viewer to have it commented on by stakeholders

Step 1. - Create a Dossier Structure

First we create a dossier structure in a cabinet to store our data.

To create a dossier structure:

  • Go to the Architecture Repository or the Visual Designer
  • Create or open a Cabinet
  • Select the cabinet in the Explorer Treeview
  • Create a dossier
  • Create four folders in the dossier: Data, Model, View, and Visualization

Step 2. - Enter Data

On Dragon1, you can enter data by dragging shapes to a folder.

To enter data:

  • Go to the Visual Designer
  • Create or open a Cabinet
  • Select a folder
  • Insert shapes from the Draw Archifact or Draw Entity dropdown menu
    • For the business model choose the shapes for three worlds:
    • Customers' World: Process, Product, Actor, Stakeholder, Value, Time, Money.
    • Channel Partners World: Process, Product, Application, Technology, Actor, Stakeholder, Value, Time, Money.
    • Suppliers/Producers World: Process, Product, Application, Technology, Actor, Stakeholder, Value, Time, Money.
  • Select a shape in the treeview
  • Select the shapes' icon on the canvas
  • Change the name of the shape at the right top in the text attributes of the Inspector

Step 3. - Create a Model, using the data

To create a model:

  • Go to the Visual Designer
  • Create or open a Cabinet
  • Select a folder
  • Insert models from the menu bar
    • Create models for the business model for every entity class you have used
    • Process model, Service model, Product model, etc...
  • Enter a name for the model
  • Optionally choose a type for the model
  • Insert shapes like processes and applications for the model by clicking on Draw Archifact or Draw entity and drag the shape onto the canvas
  • You can change the color and size of the shapes
  • Draw connections between the shapes using the smart tools of a selected shape.

Step 4. - Create links between models

To create a link between models:

  • Select a model in the Explorer Treeview
  • Select a shape in the model
  • Enter a link to another model in the LinkURL field of the text attributes

Step 5. - Create a View, using the model

To create a view:

  • Go to the Visual Designer
  • Create or open a Cabinet
  • Select a folder
  • Insert views from the menubar
    • Create views for the business model for each model you created:
    • Functions view, Process view, and Applications view, etc.
  • Enter a name
  • Select the model to use
  • Enter a viewing rule for the model data:
    • Rule Event: onload
    • Rule Condition: Class=Process;Name=Sales;Relation=FirstLevel
    • Rule Action: Show(name)

Step 6. - Create links between views

To create a link between views:

  • Select a view in the Explorer Treeview
  • Select a shape in the view
  • Enter a link to another view in the LinkURL field of the text attributes

Step 7. - Create a Visualization, using the views

To create a visualization:

  • Go to the Visual Designer
  • Create or open a Cabinet
  • Select a folder
  • Insert a visualization from the menubar
  • Drag a shape on the canvas. You will use this shape to generate the view data on the canvas.
    • For the business model uses the shapes mentioned above
  • Save the visualization
  • Select one of the three view shapes
  • Enter the following view rules in the data attributes panel of the inspector.
    • Rule Event: onload
    • Rule Condition: Class=Process
    • Rule Action: Show(name)

Do this for all three view shapes

With this rule you will only see the processes from the view data. You can also show the whole view with Rule Condition = *.

Step 8. - Publish the visualization

To publish a visualization:

  • Select a visualization in a folder
  • Click on the Share button in the menubar
  • Enter the correct data in the dialog
  • Click on the share button in the dialog
  • Go to the Viewer and search for your visualization by its title
  • Add a comment to the visualization
  • Filter the visualization on certain values

Read more

Read more about business modeling here.